I have constructed a three part Shrike in polystyrene, using a hot glue gun for initial assembly.
The main ingredients of this type of build are the polystyrene and the hot glue gun. It is just simple polystyrene:
https://www.dedeman.ro/ro/polistiren-extrudat-zentyss-xps-interior/exterior-cant-drept-10-x-500-x-1000-mm/p/6035521
http://www.zentyss.ro/en/products/extruded-polystyrene-x-pan/xpan-extruded-polystyrene
There are many similarities with using plywood, but there are some differences.
The sheets of polystyrene have the following dimensions:10 x 500 x 1000 mm.
I simply glued the sheets together on the 500 mm side with the heat glue gun. In a matter of minutes I had a sheet measuring 10 x 500 x 6000 mm.
With a cutter I cut two panels from that plate. There is enough rigidity in the glued panel. I made another 6000 mm plate, and cut another 2 panels. I beveled the edges.
You cannot stitch the polystyrene. I have tried and doesn't work. I put the panels on the external molds and glued the panels with the heat glue gun in small steps starting from the middle. I laid the glue on small portion of 10 to 20 cm, pressed the panels, waited for one minute, and then continued.
I used smaller sheer clamps 10 mm X 20 mm. I glued them with the heat glue gun in small steps.
Bear in mind that the polystyrene has no structural purpose at all. There is a need for skins of glass fibre and epoxy resin on both sides, inside and outside.
Small thickened epoxy fillets are required between the panels. I glass coated the inside of the hull after I set up the bulkheads. The fiberglass was 300 grams per square meter. One layer of 300 grams fiberglass is enough.
I turned the hull upside down, rounded and sanded the edges, and glass coated the outside of the hull.
For the deck I pre-coated the panels with glass the on the inside. The polystyrene with one side coated with glass made a perfect double curvature in the foredeck.
I put the maroske copper fittings on the undersides of the deck and glued the deck to the hull in small steps with the glue gun.
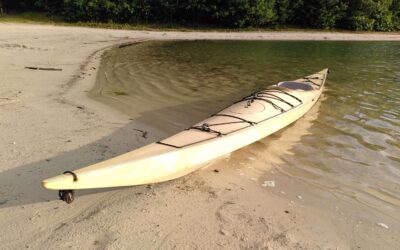
The surface is a little bit rough. I will fair it with lightweight epoxy filler in the spring when heat is available, and will then paint it. The kayak weighs 17,5 kg without paint and skeg, and it took me 80 hours to build.The kayak is great. I found out what means primary stability means! It turns on a dime.
I think polystyrene is a choice for a fast build, for builders who are not very skillful. And you don't worry about scratches that would affect wood. I cannot say enough how easy it is to build with polystyrene. A walk in the park! I understand that the aim of the project is to make kayak building available for as many people as possible, and I believe that the use of polystyrene is a step further in this direction.
More photos at
https://photos.google.com/share/AF1QipNYCzuCh8_aiKaegAU4RKx0DcDy8gK6eubyVwSkmduwdXizzbspusn0c5nDHkqOGQ?hl=ro&key=MmF5dkZWdWN4UVhTSEJhUUJ5bWE3c3lDcEhpZHlB
Thank you for making and sharing such an amazing project!